Wednesday, August 27, 2014

Application (user) Management

Hey!

I am talking about the Application Management time to time in my posts and now I'd like to tell you a little bit about the application user management in TransSQL.

First of all, I'd like to make this "application" notion clear. By saying "application" we mean some kind of shortcut that your developers will use every time they create a new package.

To deploy some code from server X to server Y, you need to declare the server X and its database, server Y and its database, besides the version of the application (if applicable). Repeating this process every time to create a new package is boring, time consuming and error-prone, also these details can be complex and difficult to remember especially when there are lots of databases and servers in the environment. Application notion comes into play to prevent from this problem.

TransSQL administrator(s) can create applications in the Applications tab in TransSQL once for every environment and developers use those application name and environment details to create packages. Every application must have at least one environment, but they can have multiple environments too. For instance an application can have a "Development->Test" environment and it can also have a "Test->Production" environment. It will be listed for once in the Applications drop down box in the Package entry tab in the main window but when you choose it, you will see two environments in the Environments drop down box according to this scenario.

After explaining the application notion, I'd like to talk about a scenario about adding a new application.

To deploy some code from one database to another, TransSQL's application user has to have permissions on those databases. As we know that this could be a cumbersome task to do, we thought it would be better if TransSQL performs this task itself. I will try to explain how it happens with the help of some screen shots below.

When you enter the necessary information to add a new application and hit the Add button, the following message window pops up.

Pops up when you hit the Add button.
I will not write further details as the message in the message box is self-explanatory. However I need to say that you may opt to perform this task yourself. Although until now we have not met a situation where a manual action could be needed, but it's optional anyway.

If you hit the Yes button, TransSQL first performs these tasks on the source database. Please be informed that, TransSQL performs these actions using your Windows account. If your user does not have necessary permissions to perform these tasks, then the operation will fail.

All done tasks are listed as a summary of the operation.

As a reminder, you can see that two application users are created. The names of the application users may vary according to your choice during TransSQL's database setup. The first application user is the one which is used to perform deployments and the other one which has a "_reader" suffix is used to run SELECT queries against your servers which can be done using the List type in the Package entry tab.

If the users are already exist at the database then they are not recreated but they are fixed to prevent from a possible orphaned-user problem.

If the users are already exist at the database then they are fixed to prevent from a possible orphaned-user problem as the message explains.
These explanations concludes this post.

Thanks for your time!
Ekrem Onsoy

TransSQL is agentless!

Have I ever mentioned that TransSQL runs agentless?

You do not have to install some kind of an agent on your development, test / pre-production or production SQL Server servers to make TransSQL run.

As TransSQL's features appear according to users' permissions developers, business analysts and administrators can use the same Client application to use TransSQL.

The only extra work that must be done is to set up TransSQL's own database. It must be configured and installed by an administrator only for once. Then all users including the administrators connect to the same database to save code packages and other details about deployments.

Ekrem Onsoy

Merhaba dünya!

Merhabalar!

Biz, Microsoft SQL Server veritabanı yöneticileri, danışmanları ve iş analistlerinden oluşan bir takımız ve Microsoft SQL Server için TransSQL adında bir kod taşıma aracı geliştiriyoruz.

Microsoft SQL Server ile çalışıyor olan, özellikle sistem yöneticileri ve veritabanı yöneticileri arkadaşlarımızın iş hayatlarını kolaylaştırmak adına böyle bir aracı geliştirmek için birçok motivasyonumuz oldu.

Bugünlerde TransSQL'in geliştirme ve işlevsellik testleriyle çok meşgulüz, bu nedenle resmi internet sitemizi daha sonra yayınlayacağız. Bu araç için çok heyecanlıyız ve bu heyecanımızı da bu ürünün esas kullanıcısı olacak olan sizlerle de bu şekilde paylaşmak istedik.

Lütfen geliştirme ve test süreçlerinin hala devam ettiğini ve ekran görüntülerinin yayımlanacak olan versiyonda değişebileceğini bilin.

Bu yazıda kullanılan ekran görüntüleri her ne kadar İngilizce olsa da, eğer TransSQL'i bir Türkçe Windows işletim sisteminde açarsanız, TransSQL'in arayüzü de otomatik olarak Türkçe olacaktır.

Öncelikle size TransSQL'in Microsoft SQL Server ortamlarınızda size nasıl yardımcı olabileceğinden özetle bahsetmek istiyorum.

Sorun 1: Birçok firma kamu kurumlarıyla, bankalarla, hastanelerle ve finansal kurumlarla çalışıyor, ki bu kurumların verileri oldukça kritik ve bu tür firmaların çoğunun düzenlemeleri ve teftişleri var. Bu kurumlar çalıştıkları iş ortaklarının kendi belirledikleri bazı güvenlik şartlarına uymalarını istiyorlar, aksi takdirde yaptıkları teftişlerde saptadıkları bulguları aleyhinize kullanabiliyorlar ve bu da o kurumun firmanıza iş vermemesine kadar gidebiliyor. Bu kurumlar ve firmanız arasındaki işbirliği neticesinde bu kurumlara ait kritik bilgileri kendi veritabanı sunucularınızda barındırmanız gerekebilecek. Verilerin kritikliği nedeniyle (örneğin ilgili kurumun müşteri bilgileri gibi) bu kurumlar sizin IT personeliniz dahil hiçbir personelinizin doğrudan, kontrolsüz bir şekilde bu veriye ulaşamamasını, değiştirememesini isteyebilecek.

Çözüm 1: SQL kod geliştiricileriniz DML / DDL işlemlerini TransSQL ile yapabilirler. Doğrudan üretim sunucularınıza (production server) bağlanmalarına gerek kalmaz. Eğer TransSQL yöneticisi izin verirse, kullanıcılarınız yine TransSQL vasıtasıyla doğrudan üretim sunucularınızda SELECT komutu çalıştırabilirler. Yine TransSQL yöneticisi isterse çalıştırılacak bu SELECT komutunun sonucunda gelecek olan kayıt sayısını da sınırlayabilir ve hatta panoya kopyalamasını da engelleyebilir. Bu ayarların hepsi birkaç fare tıklamasıyla yapılabilir!

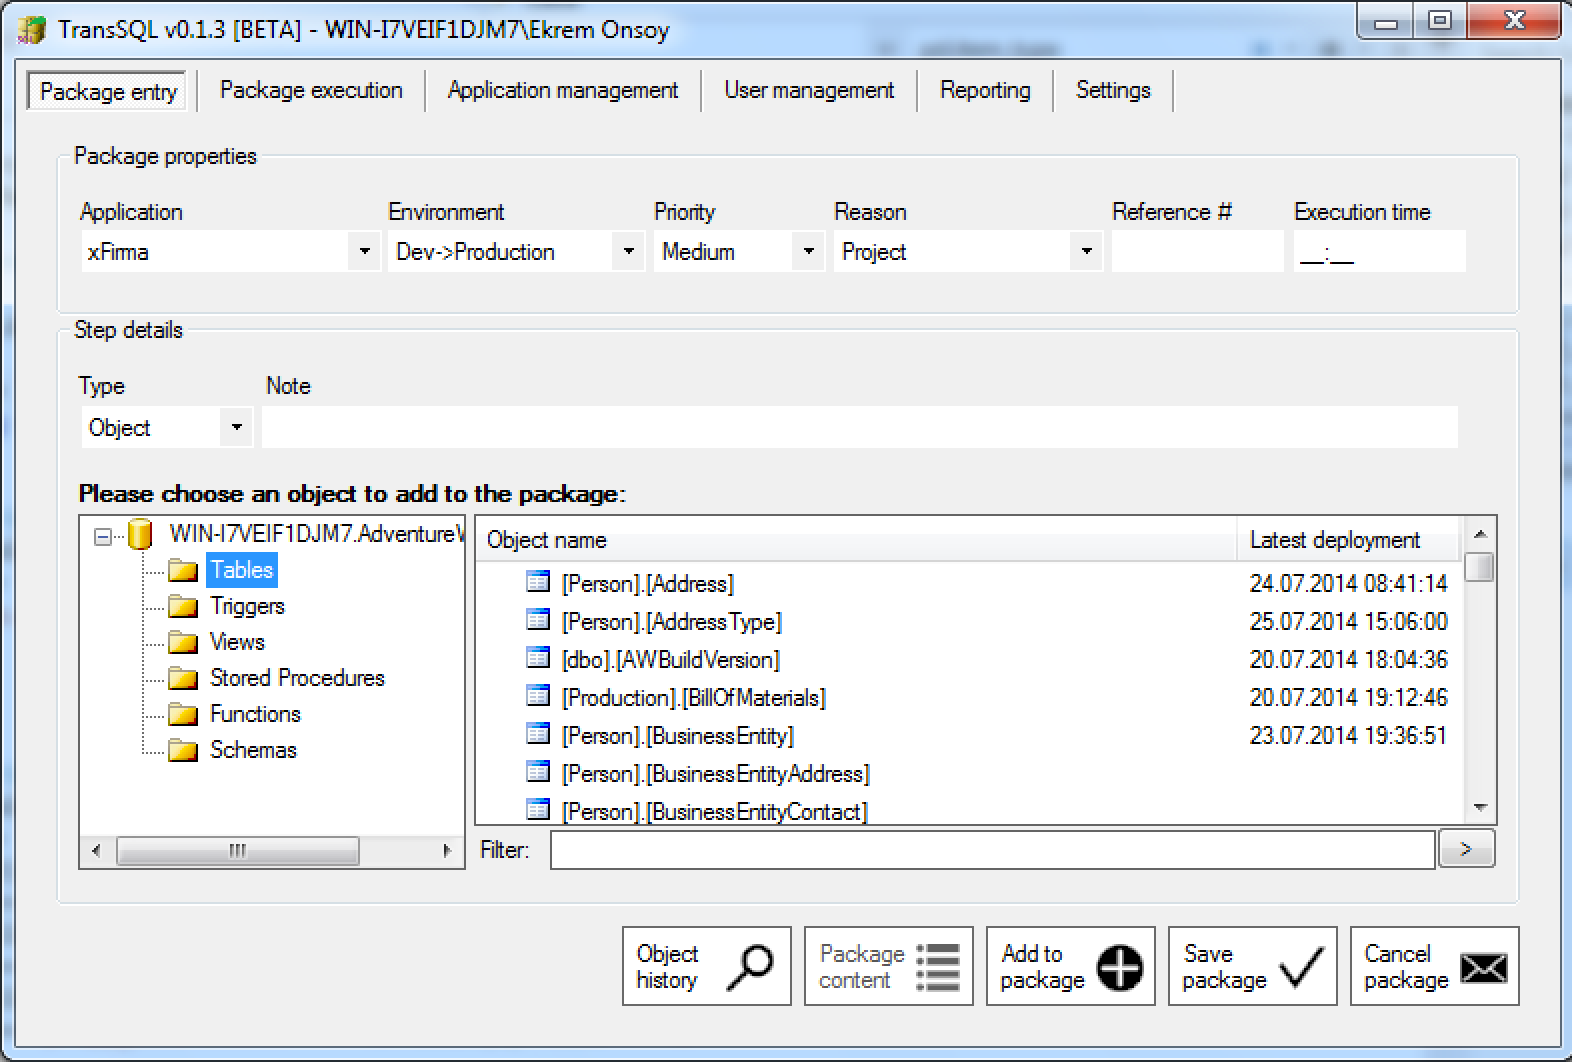
Paketler, uygulamalar için oluşturulur ve her uygulamanın en azından bir ortamı vardır. Bu ayrıntılara Uygulama Yönetimi bölümünden ulaşılabilir. 
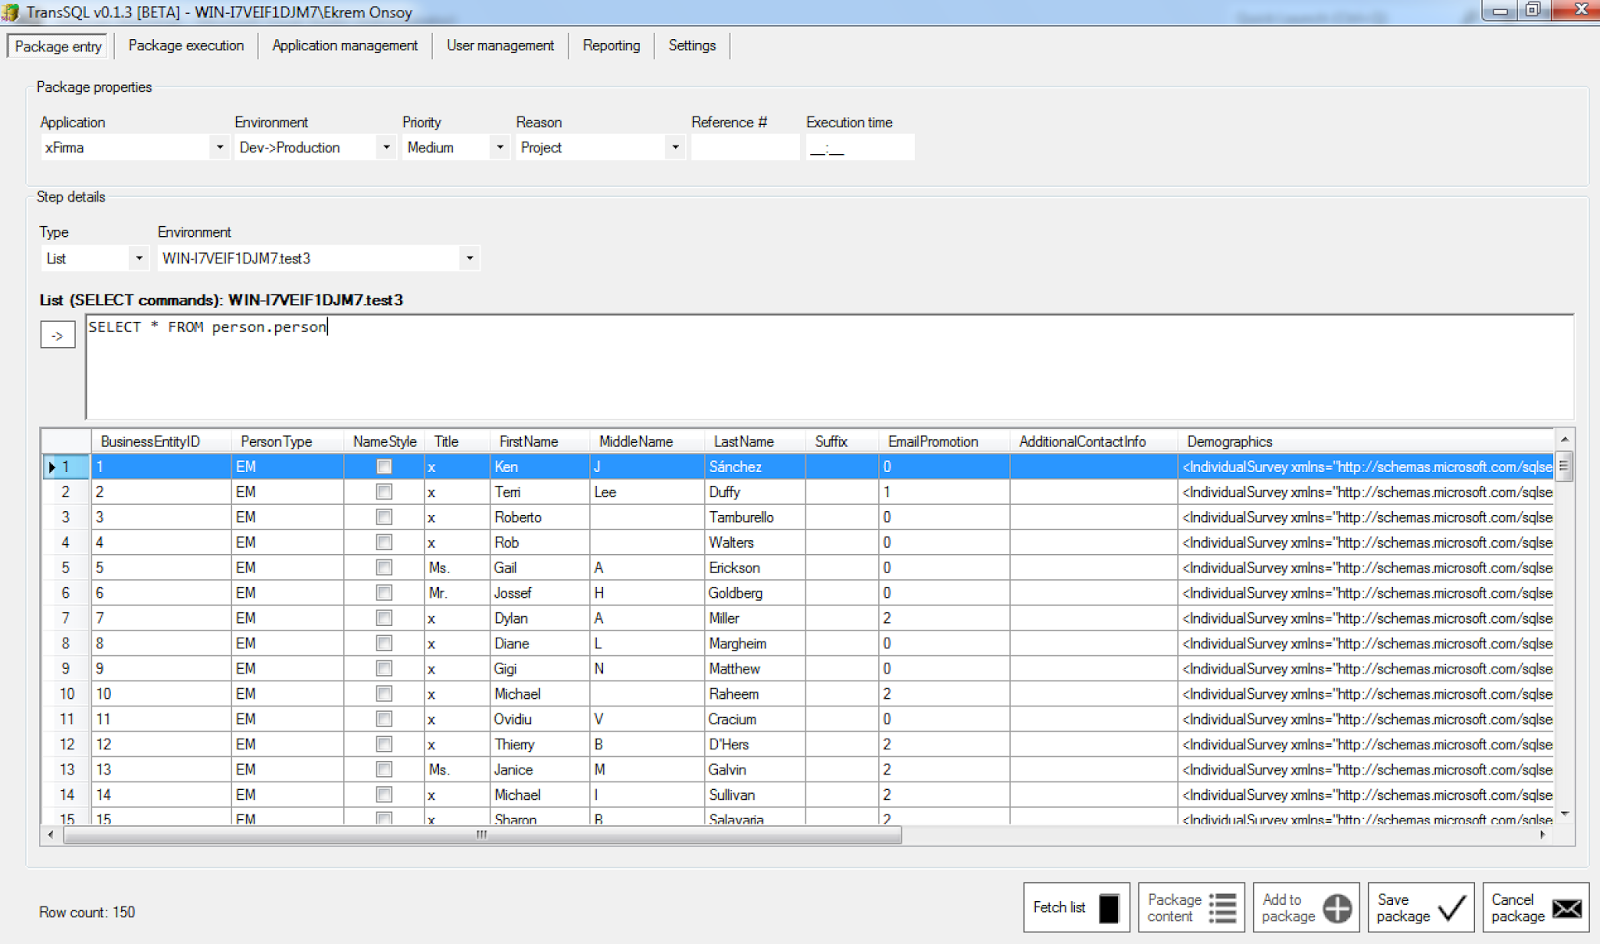
Kullanıcılar Tip'lerden Liste'yi seçtiklerinde kaynak ve hedef veritabanlarına karşı SELECT komutu çalıştırabilirler. Bu özellik Ayarlar sekmesinden yönetici tarafından kapatılıp açılabilir. Ayrıca SELECT komutu sonucu dönecek olan kayıt sayısı, bu ekran görüntüsünden de görülebileceği gibi yine yönetici tarafından sınırlanabilir. 

Sorun 2: Piyasadaki tecrübemizden de bildiğimiz üzere birçok uygulama geliştiricisi, veritabanında kod geliştirmenin en iyi yöntemlerinden bihaber. Genelde sadece kendinden istenilen işi yapıyorlar, kod işlevsel olarak çalışıyor, ama performansı sıkıntılı oluyor. Özellikle bu kod geliştirici arkadaşların herhangi bir bilirkişi tarafından denetlenmeden SQL kodlarını doğrudan üretim sunucularına göndermesi tehlikeli durumlar oluşturabiliyor.

Çözüm 2: TransSQL ile SQL kodlarını hedef sunuculara taşımak için geliştiriciler paketler oluşturur. Bu paketler adımlardan oluşur ve adımlar da SQL komutlarından oluşur. Paketler, kod geliştiriciler tarafından oluşturulduktan sonra TransSQL'in yöneticileri (Ayarlar'daki seçime bağlı olarak) e-posta ile uyarılırlar. Yöneticiler paketleri inceledikten sonra çalıştırabilir veya bir sorun bulurlarsa reddedebilirler. Böylece sunuculara taşınan tüm kodlar bir bilirkişi tarafından kontrol edilebilir.

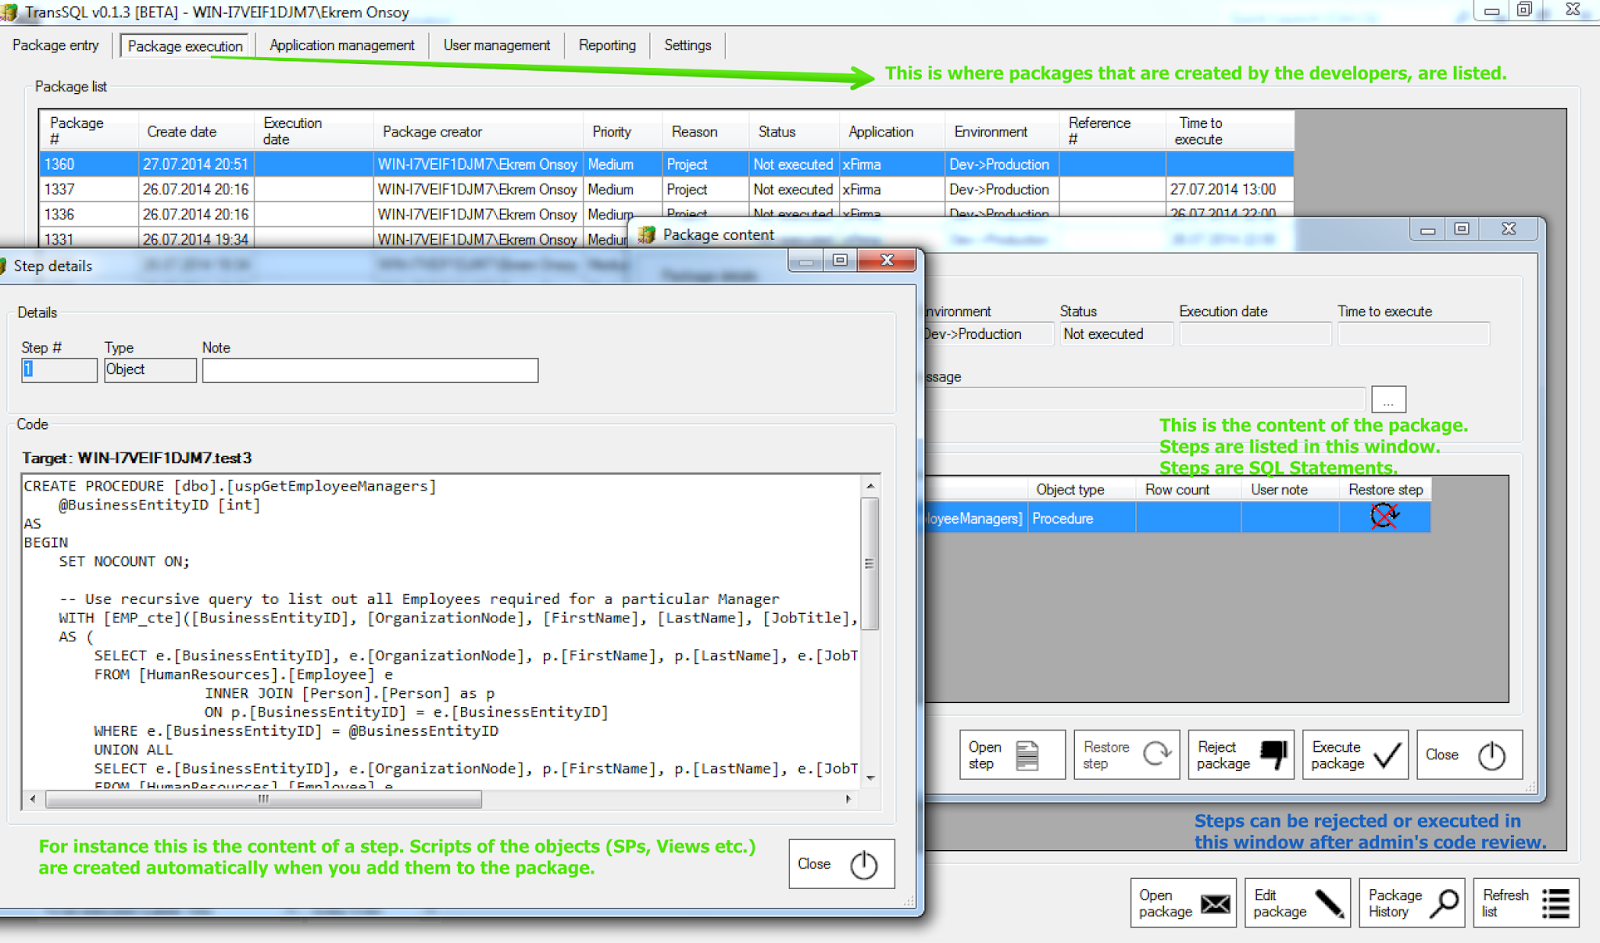
Paket inceleme. Arkaplandaki ana pencerede geliştiriciler tarafından oluşturulan paketleri görebilirsiniz ve ön taraftaki pencerede de kodun incelenme anını görüyorsunuz. Arada kalan pencerede de paketin içeriği olan adımlar gösteriliyor.
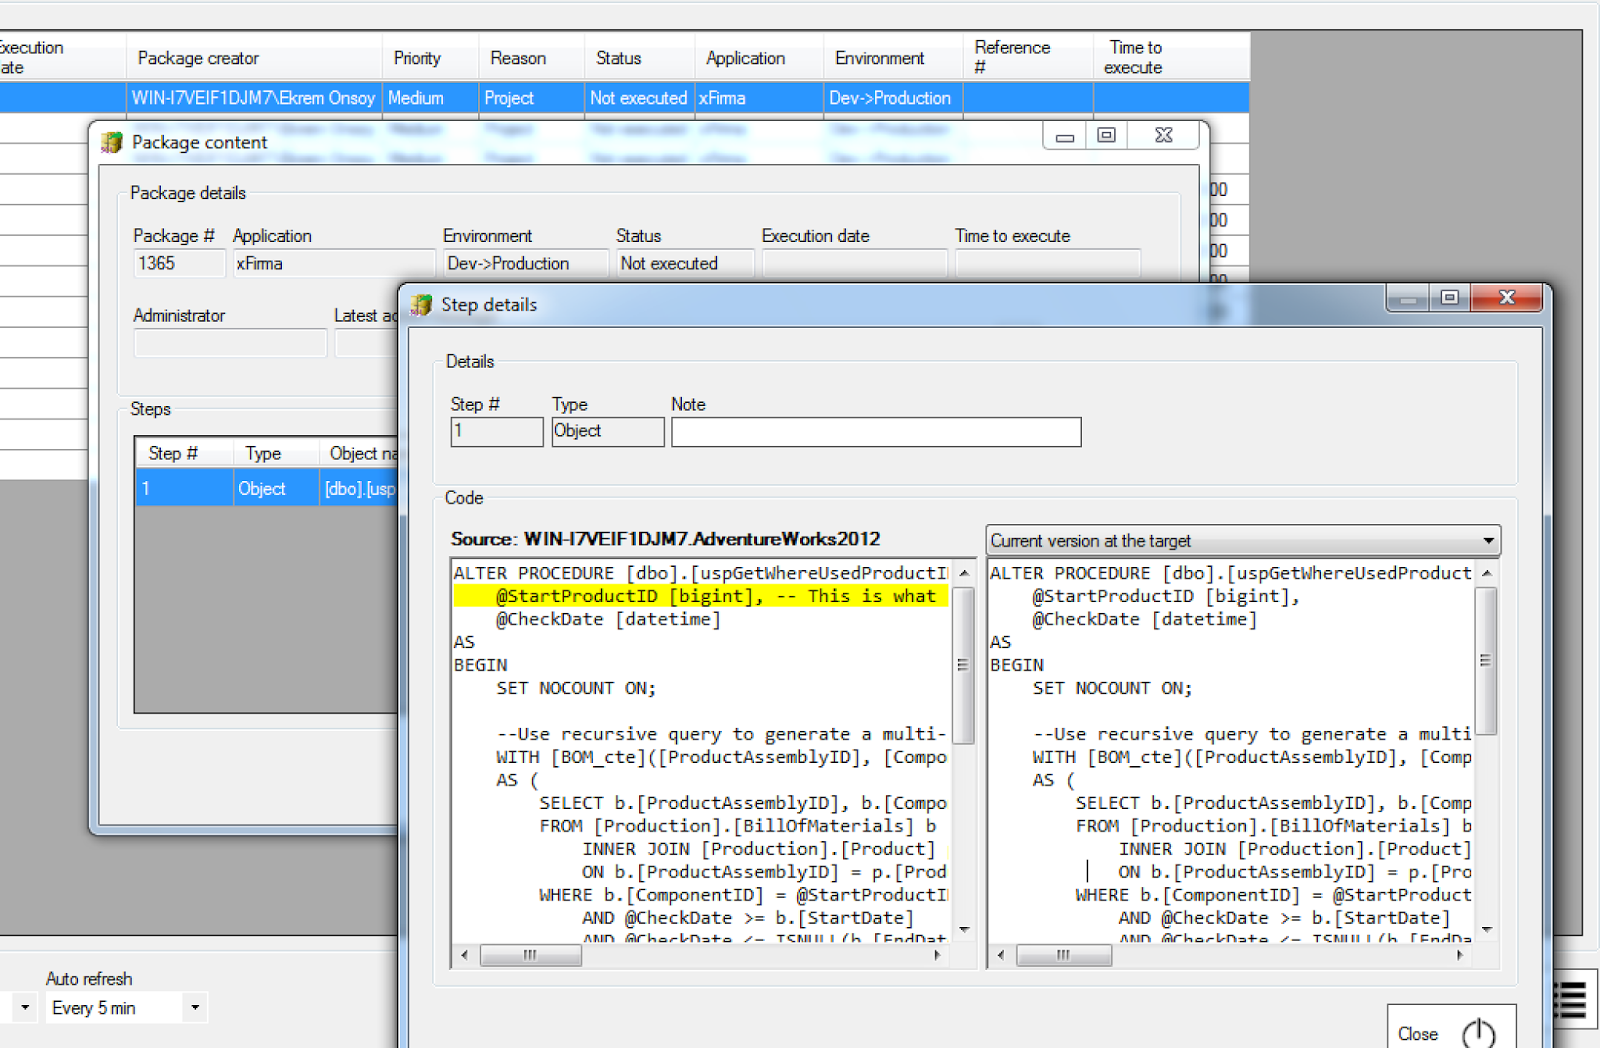
Örneğin taşınacak bir Stored Procedure hedef veritabanında zaten varsa, o zaman taşınacak yeni versiyon da, hedefteki eski versiyon da yöneticiye karşılaştırma için gösterilir. Ayrıca taşınacak yeni versiyonda nelerin değiştiği de sarı renkle işaretlenir.

Sorun 3: Kod geliştiriciler doğrudan üretim sunucularına bağlandığında ve kod değişiklikleri yaptıklarında kimse hangi kodun kim tarafından ve ne zaman değiştirildiğini bilmez.

Çözüm 3: TransSQL her taşımanın kaydını tutar. Kolayca kimin, ne zaman hangi paketi oluşturduğunu bulabilir, kimin ne zaman ve neden hangi paketi sunucularınıza taşıdığını veya reddettiğini bulabilirsiniz.

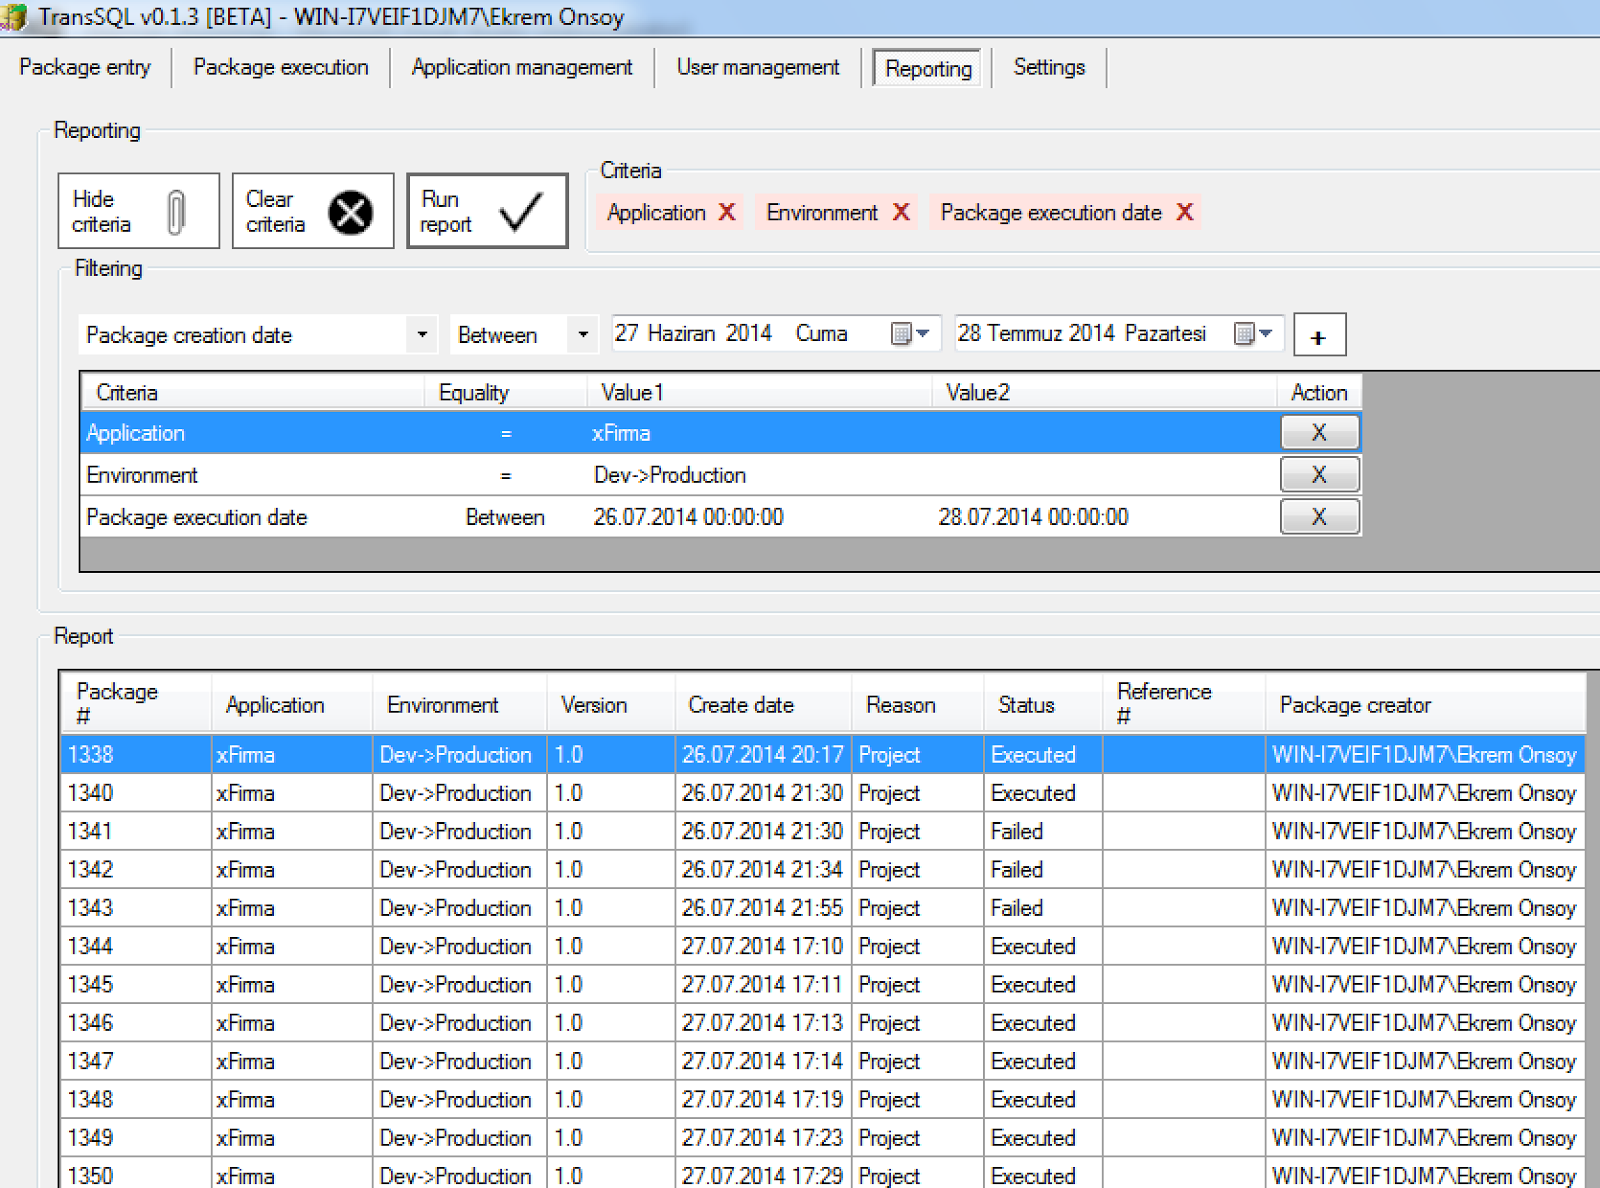
Çok yönlü ve esnek raporlama bölümünde her taşımaya ait ayrıntıları kolayca bulabilirsiniz. Aradığınızı bulmanız için kullanabileceğiniz birçok önceden tanımlı kriter mevcut.

Sorun 4: Kod geliştiriciler yaptıkları işleri dokümante etmeyi pek sevmezler, bunu hepimiz biliriz. Mesela tipik bir ortamda bir kod geliştirici kodu doğrudan üretim ortamına taşıdığında ve bu taşıma da performans veya işlevsellik sorunlarına neden olduğunda tam olarak neyin değiştiği bilinmez.

Çözüm 4: Yeni kod taşıma öncesinde TransSQL, Stored Procedure'ler, View'ler, Function'lar, Trigger'lar için eğer hedefte zaten varlardıysa önceki versiyonlarının da yedeğini alır. Böylece sorun yaşadığınız bu nesnelerin yeni kod taşıma öncesindeki versiyonlarını aşağıdaki ekran görüntüsünde de gösterildiği gibi birkaç fare tıklamasıyla geri alabilirsiniz.


Bunlar, Microsoft SQL Server taşımalarınız için TransSQL'i kullandığınızda kazanacağınız avantajların sadece birkaçı.

Peki TransSQL nasıl çalışıyor?
- Öncelikle "Uygulama yönetimi" bölümünde bir uygulama tanımlamanız gerekiyor. Bu sekmede, veritabanı uygulamanız için tabiri caiz ise bir isim uyduruyorsunuz, bunun bir anlamı olmak zorunda değil, daha sonra bir ortam, kaynak Microsoft SQL Server Instance ve veritabanı isimlerini, hedef Microsoft SQL Server Instance ve veritabanı isimlerini ve varsa da uygulamanızın versiyon bilgilerini belirliyorsunuz.


- Uygulamanızı tanımladıktan sonra kodlarınızı belirlediğiniz kaynak ve hedefler arasında taşımak için paketler oluşturmaya başlayabilirsiniz. Paketler, ilk sekme olan Paket girişi sekmesinde oluşturulur. Paketinize DML / DDL komutları ekleyebilirsiniz. Paketler önceden de belirttiğim gibi adımlardan oluşur. Bir adım CREATE PROCEDURE script'i veya DELETE table SET field1 WHERE field2 = xxx script'i veya kaynaktan hedefe veri aktarmak için bir Aktar adımı olabilir.

- Paketinizi düzenledikten sonra onu kaydedebilirsiniz, akabinde yöneticiler paketinizi Paket çalıştırma sekmesinde görecekler. Ayrıca yeni paketleriniz hakkında (Ayarlar bölümündeki seçime bağlı olarak) e-posta ile bilgilendirilecekler. Siz de paketiniz çalıştırılırsa, reddedilirse veya paketniz çalıştırılma esnasında hata alırsa (Ayarlar bölümündeki seçime bağlı olarak) e-posta ile bilgilendirileceksiniz.

Bu kadar! TransSQL'i öğrenmek sadece birkaç dakika alıyor.

TransSQL'i kullanacak kullanıcılara çeşitli yetkiler verilebiliyor. Örneğin bazı kullanıcılarınızın sadece paketi oluşturmasını ve bazılarının sadece paketleri inceleyebilmesini belirleyebilirsiniz. Sadece belirlediğiniz kişiler paketleri çalıştırabilir.

Lütfen yorumlarınızı esirgemeyin. TransSQL'i daha iyi ve verimli bir ürün yapmak için düşüncelerinizi ve önerilerinizi bizimle paylaşmaktan çekinmeyin.

Zaman ayırdığınız için teşekkürler!

Ekrem Önsoy

Tuesday, August 12, 2014

Step types: List

Hello!

This is the last step type I will be talking about in this series of posts about the package step types in TransSQL. In practice, a List step type can not be added to a package. Actually if an application administrator unchecks the "Package entry: Let users run SELECT queries against source and target servers." option in the Settings page, then users do not see this step type in the user interface at all. I will be talking about all the available Settings later, in another post.

The aim of the List step type is to let the users to run SELECT queries against the source and target tables. By deploying your SQL statements using TransSQL, you already eliminate the necessity to grant modification permissions to your users. Using the List step type, you do not need to grant even SELECT permissions to your users. All is handled by TransSQL!

Technically, it is not possible and safe to prevent users from running some other commands than SELECT in a screen like this, at least we have not figured it out yet! So we preferred using another application user account to run SELECT statements and this account has only SELECT permissions. This account is created automatically by TransSQL. So there's no any potential breach problem using this method. So, as you can figure it out, there are two application users of TransSQL. One is used for deployments and the other one is used to run SELECT statements against your source and target database tables.

Step type: List

Above, you can see a screen image of List step type page. You can choose the source or target database from the Environment drop down box in the Step Details group box. Just choose your environment, write your SELECT statement and hit F5 as you do in SQL Server Management Studio. An application administrator can limit the result set for the target environments as the data at the target tables may be critical. For instance in some scenarios, some third party auditors do not want your users to query production tables in large chunks. An application administrator can also prevent the result set to be copied to clipboard. All of these options are available in the Settings tab. Below, you can see a partial screen image from the Settings tab which is related to List step type:

Some options related to List step type
For your comfort, each row is numbered starting from 1 and total row count is shown at the left bottom corner of the window.

You can also transfer a selected text or all text (if not selected) to the Query step type window using the small buttons at the left side of the statement text box. It's also possible to save the result set into a *.csv file, again using one of those small buttons at the left or using the context menu of the data-grid using the right mouse button.

Thanks for following up to this point. This post concludes our step type blog series.
Ekrem Onsoy

New User Interface trials

Hello!

We listen to you! Your feedbacks and thoughts are invaluable to us. One of our early adopter customer asked for a new User Interface (UI) design. So we have started working on an alternative UI design for TransSQL.

Below, you can see the plain UI of TransSQL:

There's no a background image, pure light grey or there's no extra effect.

And this is the alternative UI:

The background image can be replaced with pure light grey, this is an optional choice. The menu that helps you to stroll around the pages are totally different than the previous UI design.

What do you think about them? Which one would be your choice?

Cheers,
Ekrem Onsoy


Monday, August 11, 2014

Step types: Export

Hey!

Now, I am continuing Step Types blog post series with the step type Export. Before this one, I wrote about Query and Object step types.

Object step type differs from the Query and Object step types in terms of compatibility and of course functionality. This step type -at least in this major version of TransSQL- is incompatible with the others. Export step type must be the only step in a package. So what can you do with an Export step? Actually the name tells about itself, it's used to export some records/rows from a source table to another at the target.

When you choose the Export step type from the Type drop down box, a similar screen appears as shown below.

Export step type screen image.

When you click on the small down arrow button at the right side of the Source table drop down list, you can see the table list from the source database and select one to export its records to another existing table at the target database.

When you click on the down arrow of the Source table drop down box, table list appears with their schemas.
These tables are from the source database.

When you choose a table name to export, then the export query is created for you automatically. You can also edit this query to add some filtering criteria such as

... WHERE [EmailAddress].[ModifiedDate] > '01.01.2009';

There is another informational box whose caption is "Row count" and it shows the total row count of the selected table in this step type. You will probably remember this box from the Query step type too, however in Export step type you can not modify this value, it's read-only. It is calculated automatically in this case. As I said, it's used only for informational purpose for this step type. With this in mind, if you add some criteria to the Export query which changes the number of the rows to be affected, then in the Package Content window you will see that the row count value will be calculated on the fly.

In this screen shot Person.EmailAddress table has been chosen from the "Source table" drop down list.

Target table name is automatically filled with the same schema and table name, however you can change it if the target schema or table name differs from the source schema or table name.

There are two options for IDENTITY_INSERT setting and table trigger if there is any on the target table.

Identity_insert: If you choose ON for the Identity_insert then the Identity values of the source table will be preserved; otherwise, if it's OFF new values will be used at the source table.

Trigger at the target: If Disabled is selected in the "Trigger at the target" option, then the triggers at the target table (if there's any) will not be triggered while the records are imported into the target table. Otherwise the triggers will be triggered as expected.

In this version of TransSQL, you must create the table schema at the target database before exporting data into it.

Now there is one step type left to look into and it is called List. I will talk about it the next time.

Thanks for your time!
Ekrem Onsoy

Friday, August 8, 2014

Step types: Object

Hello,

In this blog post series, I am writing about the package step types in TransSQL. This is the second step type I write about and in my previous blog post I wrote about the Query step type, package and step concept. You can find that post using this link: http://www.transsql.com/2014/08/step-types-query.html

Now it's time to talk about the Object step type! Below, you can find a screen shot of a package which contains 4 steps. 3 of them are Object step types and one of them, the 4th one is a Query step type. You can combine Object and Query step types in a package, they are fully compatible with each other.

Object package step type. There are 4 steps in the package as can be seen in the "Package content" window. "Step details" window shows the content of the selected step.

So what are Objects? What do we mean by saying "Object"? We name Tables, Stored Procedures, Views, Functions, Triggers and Schemas as objects in TransSQL. For instance, if you want to deploy a new Function you wrote on your development database server to a production server, or if you want to deploy the new version of a Stored Procedure, then you can easily script that Stored Procedure by adding it as an Object step type to a package as shown in the screen shot above.

The script of the Object will be a CREATE script by default, during deployment the target database will be checked for the existence of that object and if found then the CREATE script will be modified as an ALTER script on the fly and the ALTER script will be applied to the target database server. The target Object will not be DROPPED and CREATED again, it will be ALTERED. I will tell you much more details about the deployment procedure when I will be writing about that particular topic. Now let's do not lose our focus and wrap up.

If you want to DROP an existing object at the target database server, then you need to type a DROP PROCEDURE ...  e.g. command using the Query step type. You can use the Object step type only to deploy a new Object or alter an existing one.

If your deployment fails or succeeds then a date and time value appears at right side of the object name under the "Latest deployment" header. You can see this in the screen shot. If your deployment is rejected by the administrator or stopped, for instance if you are trying to create a table which already does exist at the target database, then this value is not updated.

You can also select an object and click on the Object History button to see the details of the previous deployments of this object.

In the next blog post, I will be writing about the Export step type.

Thanks for your time!

Step types: Query

Hi again,

I want to tell you about package step types in 4 different posts. The current step types are Object, Query, List and Export. In this blog post, I want to talk about "Query" step type.

But before that, please let me remind you about the basics of package and step concept. Packages consist of steps and steps are T-SQL DML commands like INSERT, UPDATE, DELETE or DDL commands like DROP PROCEDURE, ALTER VIEW, CREATE TABLE etc.

DML commands and DROP DDL commands are entered to the package as Query steps. CREATE and ALTER DDL commands are entered as Object types. If you want to transfer your data from your one environment to another then you choose the Export step type. List is a type, but not a step. If you need to execute some SELECT statements against your source or target servers then you choose the List type from the type list and perform your actions accordingly. This will help you when you are writing your DML codes in the Query step type window.

Now let's talk about the Query step type. To get a better understanding about the Query types please take a look at the following screen shot.

Step details window which shows details of a particular Query step type.

The image above belongs to a Query step's details. Using the "Get row count" button in the right lower corner of the window, you can learn exactly how many records will be affected by this statement at that moment. The SELECT command in the Query result section will be created dynamically by TransSQL using the original UPDATE command you enter. You will see a button with a header of "Run" just at the right side of the SELECT statement, the button executes this SELECT statement against the target database and returns the row count to the right of the button itself.

You will see an edit box about which is labeled "Row count to be affected". You can edit this box and enter a row count which is supposed to be affected. This function is useful especially when you are not sure of the affected row count. If the statement is an UPDATE or DELETE statement and if the affected row count exceeds the row count you enter to this box, then the statement will be rolled back when executed by the administrator. So you will prevent from making a mistake.

You are not obliged to enter only one line of code to a Query step. You can enter many statements at once and parser will parse all those DELETE and UPDATE commands and create SELECT statements accordingly. With this in mind, it will be more practical to create different Query steps for each statement.

You will also see a button which is captioned "Comment out" in this window. You can use this button to comment out all the commands at once. This function is there just to make things practical. You will want to use this button for instance when the Database Admin calls you and say "Hey X, I altered a Stored Procedure you wrote because of some performance problems. Here's the code I altered, please enter it to TransSQL so that it will be in our records".

You can also update your note in this window. With this note, you can transmit some useful messages to the administrator which can help him/her while he/she is executing the package.

In this blog post I tried to tell you about the Query step type and some of its functions. I hope you will like it as we do!

Thanks,
Ekrem Onsoy

TransSQL Assistant

Hi there,

In this post I'd like to introduce you to the TransSQL Assistant and give you a quick info about how can one learn to use TransSQL by himself/herself easily.

It's indeed very easy to learn to use TransSQL. When you run TransSQL for the first time, you will be welcomed by the Assistant. You can close it right away or take advantage of it by following the tips using the Next button as can be seen from the screen shot below.

TransSQL Assistant

After following all the tips, you will be able to create your packages immediately. The steps of the Assistant will differ from the permissions of the user. For instance there will be different steps for a user who only has create package permission and they will be different for an administrator.

This is not the only way to learn about TransSQL, you will see quick tool tips all around the forms when you hover over a text box or button. See the screen shot below.

Take advantage of the tooltips!
You can find tool tips for all of the critical components on every form.

These are not the only tools you can benefit to learn more about TransSQL, you will also find a decent documentation as a *.chm file with the installation of TransSQL. It covers all of the concepts, functions and explanations about TransSQL.

Have good deployments,
Ekrem Önsoy